Během uplynulého víkendu jsem téměř dokončil vývoj nového podvozku měřítka 1/43 s označením M430C Mk.2. Na vysvětlenou dodávám, že se jedná o model vyrobený z Carbonu a kovů resp. z cca 70% je tím kovem mosaz jako účinná protiváha poměrně těžkých karoserií Carrera Go. Podvozek při svém sobotním představení vzbudil zaslouženou pozornost a tak jsem netrpělivě čekal na kurýra se zásilkou serv a lipol baterií, abych mohl podvozek zprovoznit a otestovat na dráze. A popravdě bylo to celkem dramatické zprovoznění.
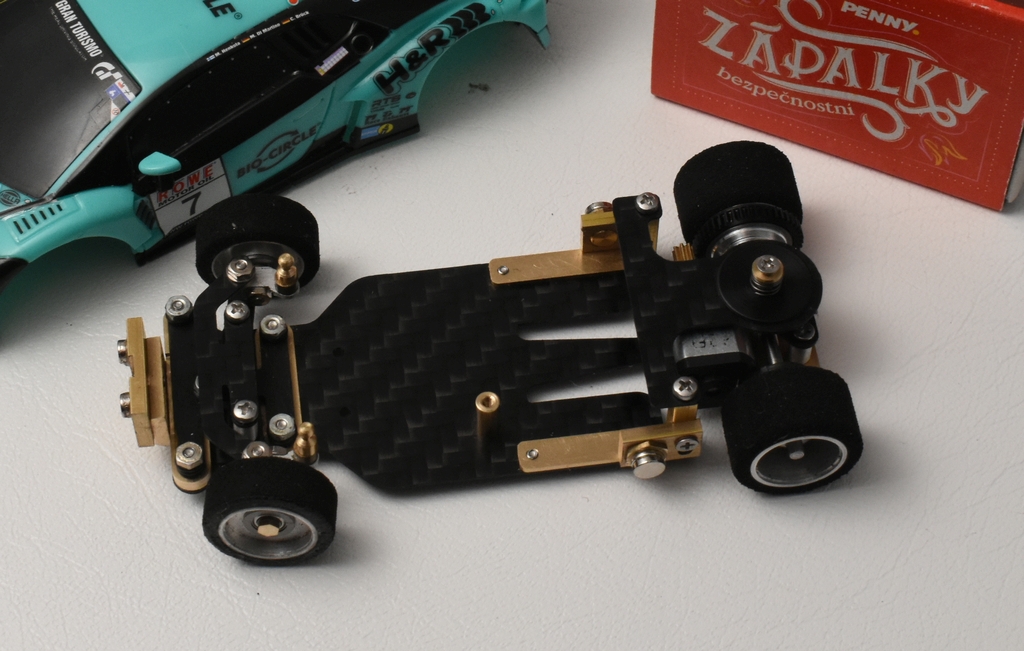
Over the past weekend I have almost completed the development of a new 1/43 scale chassis called the M430C Mk.2. I would like to clarify that this is a model made of Carbon and metals or about 70% of that metal is brass as an effective counterweight to the relatively heavy Carrera Go bodies. The chassis attracted well-deserved attention during its presentation on Saturday, so I impatiently waited for the courier with a shipment of servos and lipol batteries so that I could get the chassis up and running and test it on the track. And to be honest, it was quite a dramatic launch.
Předcházelo mu nedělní lepení neodymových magnetů a držáků do karoserie a zejména pak včerejší oživování jednoho regulátoru ze starých šuplíkových zásob. Jednalo se o programovatelný DC obousměrný regulátor z naší produkce. Když jsme totiž tyto regulátory někdy před téměř deseti lety s kolegou vyvíjeli vznikla i ultra mikro varianta kde na jedné desce s rozměrem cca 21x13mm byla modifikace pro 1S lipol napájení. Tehdy se vyrobilo asi 8 kusů a postupem času našly některé po implementaci BEC stabilizátoru svoje uplatnění v modelech 1/28, ale cca 4 kusy mi tu zůstaly na skladě. Jeden už řídí 14 dní první model 1/43 a protože jsem nechtěl elektroniku přehazovat a mít tak možnost nový carbonový a starší sklolaminátový model přímo porovnat, potřeboval jsem aspoň jeden kus zprovoznit. No nebudu psát podrobnosti ale byl to boj … za těch skoro deset let nějak zestárly oči a tak jsem se s tím opravdu pral. Nakonec se přeci jenom po asi pěti hodinách úsilí podařilo další kus oživit a zkalibrovat s vysílačem. Takže když dnes po poledni kurýr přivezl balíček se servy Bluebird a potřebné akumulátory mohlo vše začít. Jelikož v těchto nejmenších modelech už opravdu není místa nazbyt a každý gram hmoty nad těžištěm zhoršuje jízdní vlastnosti bylo nutno se zbavit u přijímače krabičky i konektorů. Roky jsem měl ve skladu nevyužité přijímače Orange DS300 které jsou kompatibilní se starším vysílačem Spectrum a tak na ně nyní jak jak se říká konečně došlo. Zcela upřímně asi bych nechtěl riskovat takové úpravy na nějakých drahých přijímačích Sanwa, Kopropo, apod. Servo i regulátor jsou do desky přijímače napevno připájeny. Jednak tím člověk opravdu ušetří místo a hmotnost a pak také je tohle ve finále celkem spolehlivé, tedy skoro bych řekl, že spolehlivější než obvykle užívané konektory.
It was preceded by Sunday’s gluing of neodymium magnets and holders to the bodywork and, in particular, yesterday’s reviving of one regulator from old drawer stocks. It was a programmable DC bidirectional regulator from our production. When we were developing these regulators almost ten years ago with a colleague, an ultra micro version was also created, where a modification for 1S lipol power supply was on one board with a size of approx. 21x13mm. At that time, about 8 pieces were produced, and over time, after the implementation of the BEC stabilizer, some of them found their use in 1/28 models, but I have about 4 pieces left in stock. One has been running in the first 1/43 model for 14 days, and since I didn’t want to change the electronics and have the opportunity to directly compare the new carbon and older fiberglass model, I needed to get at least next one piece functional. Well, I won’t write the details, but it was a struggle … in the almost ten years, my eyes kind of dried up, so I really struggled with it. In the end, after only about five hours of effort, another piece was revived and calibrated with the transmitter. So when the courier brought the Bluebird services and the necessary batteries this afternoon, everything could begin. Due to the fact that in these smallest models there is really nothing to more free space and the reciever box is really above the center of gravity and exist of risk deteriorated driving characteristics, it was necessary to get rid of the receiver and connectors. For years I had unused Orange DS300 receivers in storage, which are compatible with the older Spectrum transmitter, and now, as they say, they finally came. Quite frankly, I probably wouldn’t want to risk such modifications on some expensive Sanwa, Kopropo, etc. receivers. Both the servo and the controller are soldered to the receiver board. On the one hand, this really saves space and weight, and in the end, this is also quite reliable, so I would almost say more reliable than the usually used connectors.
Zapojení a oživení elektroniky dnes už proběhlo bez problémů (až na ty unavené oči) a tak se přiblížil okamžik prvního přidání plynu na dráze. Model byl osazený následovně:
Connecting and reviving the electronics today already took place without any problems (except for those tired eyes) and so the moment of the first gas addition on the track approached. The model was fitted as follows:
Servo: Bluebird BMS-101DMG 4,4g/0,07s/1kg – kovové převody, velmi malé rozměry, nicméně do modelu se musí osadit s odříznutými „pacičkami“ a pro montáž je použitý speciální mosazný blok který se na servo přilepí. V prvním modelu jsem to lepil kvalitním epoxydem UHU a v tomto carbonovém šasi jsem zkusil lepit střední hustotou sekundového lepidla. Pochopitelně že je celkem lákavé zkusit servo nalepit nějakou oboustrankou ale přiznám se, že zrovna s tímhle mám z minulosti velmi špatné zkušenosti. Ono stále nějak trimovat přímý směr u serva které se po nárazech dá do pohybu není opravdu nic zábavného a navíc jsem tak nějak tušil že u těchto nejmenších modelů by mohly dělat významné potíže třeba i desetiny milimetru posunu. To se také nakonec ukázalo jako hodně pravdivé. Takže rada a doporučení zní, nepodceňujte pevnou a stabilní montáž serva. Závěrem jedna technická poznámka. I když toto servo nemá výslovně uvedenu garantovanou funkčnost na 1S napájení tedy na cca 3,2-4,2V ukazuje se, že i při dost vybitém stavu akumulátoru funguje. A pokud se objeví výpadky tak už je jasné že je třeba nabíjet, takže se to tak trochu chová jako lipo stop. Jediná věc je snad jen ta že je servo trochu pomalejší ale s ohledem na geometrii přední nápravy a řešení táhel v modelu jsem vlastně ani nezaznamenal že by mi rychlost serva nestačila, prostě to servo je zatím evidentně rychlejší než moje reakce na dráze.
Servo: Bluebird BMS-101DMG 4.4g/0.07s/1kg – metal gears, very small dimensions, but must be fitted with modeled „paddles“ cut off, and a special brass block is used for mounting, which sticks to the servo. In the first model, I glued it with high-quality UHU epoxy, and in this carbon period, I tried to glue it with a medium density second glue. Of course, it is quite tempting to try to glue the servo with some double-sided tape, but I must admit that I have had very bad experiences with this in the past. It’s not really fun to keep trimming directly on services that start to move after an impact, and in addition, I kind of suspected that even a ten-millimeter shift could cause significant problems for these smallest models. This also turned out to be very true in the end. So the recommendation is, don’t underestimate the firm and stable installation of the service. Finally, one technical note. Even though this servo does not have guaranteed functionality on 1S power supply, i.e. on approx. 3.2-4.2V, it turns out that it works even when the battery is quite discharged. And if blackouts occur, it is already clear that it needs to be charged, so it behaves a bit like a lipo stop. The only thing is that the servo is a little slower, but with regard to the geometry of the front axle and the solution of the tie rods, I didn’t even notice that the speed of the servo was not enough for me, it’s just that the servo is obviously faster than my reaction on the track.
Pohon: DC elektromotorek (zploštělé provedení) s rozměrem 10×12 čelo a délka cca 15,5mm vlastní tělo bez hřídelky. Provozní napětí cca 1,5-6V. Motorky jsem kdysi nakoupil na testování při uvažovaném vývoji podobných modelů ale v měřítku 1/32 a nakonec jako řada dalšího materiálu skončily ve skladu. Teď tedy přišel jejich okamžik a tak zatímco ve větších modelech (1/28 resp. mini-z a 1/24) už DC pohonu zvoní umíráček v těchto nejmenších modelech patrně ještě nějakou dobu budou spolehlivě využitelné. Ono stvořit nějaký takto malý bezuhlíkový motor se senzory v opravdu dobré kvalitě a s dobrými vlastnostmi asi ještě chvíli potrvá. Motorky této velikosti mám dva typy, v prvním modelu byl typ s delší hřídelí kterou bylo nutno trochu ubrousit a zde pro změnu vyšla hřídelka asi tak o 1,5mm kratší než by bylo ideální takže pastorek je na hřídelce nasazen jen zčásti. Budu asi muset pro tento motor udělat trochu delší pastorky. Převod jsem zvolil 8/46 resp. je to aktuálně nejlehčí převod, který se dá do modelu technicky dostat. Sice ještě plánuju vyrobit spurgeary 47T a 48T ale ty budou přeci jen průměrem už hodně blízko průměru kol a tedy budou opravdu hodně blízko povrchu dráhy. U včera, když jsem zkusil tento motorek jen tak naprázdno s regulátorem bylo znát že mu výkon chybět nebude a subjektivně se mi i jevil rychlejší než typ motorku s delší hřídelí. Předpoklad se dnes na dráze potvrdil, model je s tímto motorem opravdu rychlejší, ovšem také si víc vezme z akumulátoru a tak se trochu zkrátil čas ježdění na jedno nabití. Ovšem s ohledem na cenu akumulátorů nebude problém mít jich prostě po ruce víc kusů a měnit.
Drive: DC electric motor (flattened design) with a face size of 10×12 and a length of approx. 15.5mm, own body without a shaft. Operating voltage approx. 1.5-6V. I once bought the motorbikes for testing during the considered development of similar models, but in 1/32 scale, and they ended up in the warehouse as a series of other materials. So now their moment has come, and while in larger models (1/28 or mini-z and 1/24) the death knell of the DC drive is already ringing, these smallest models will probably be reliably usable for some time to come. It will probably take a while to create such a small carbonless motor with sensors in really good quality and with good properties. I have two types of motorcycles of this size, in the first model there was a type with a longer shaft that had to be ground a little, and here, for a change, the shaft came out about 1.5 mm shorter than it would be ideal, so the pinion is only partially mounted on the shaft. I’ll probably have to make a little longer pinions for this motor. I chose the ratio 8/46 or it is currently the lightest transmission that can be technically put into the model. Although I still plan to make 47T and 48T spurgears, they will be very close to the diameter of the wheels and therefore will be really close to the track surface. Yesterday, when I tried this motorcycle just empty with the regulator, I knew that it would not lack power and subjectively it seemed faster than the type of motorcycle with a longer shaft. The assumption was confirmed today on the track, the model is really faster with this engine, but it also takes more from the battery and thus the driving time per charge has been shortened a little. However, considering the price of accumulators, it will not be a problem to simply have several pieces on hand and change them.
Akumulátor: Jak již bylo dříve uvedeno, model je tak nějak ušitý na míru akumulátoru lipol 1S 20/30C s kapacitou 200mAh a s rozměry cca 20x31x6mm. Tento typ lipolky se sice dá koupit v jednočlánkovém provedení ale levnější je defacto rozebrat dvojčlánek, připájet kvalitní tenké silikonové vodiče a miniaturní konektory. K tématu konektorů se později vrátím v samostatném článku.
Accumulator: As previously mentioned, the model is somehow tailor-made for a lipol 1S 20/30C accumulator with a capacity of 200mAh and dimensions of approx. 20x31x6mm. This type of li-pol can be bought in a single-cell design, but it is defacto cheaper to disassemble a double-cell, solder high-quality thin silicone wires and miniature connectors. I will return to the topic of connectors later in a separate article.
Regulátor: Jak bylo už výše řečeno do prvního modelu M430 a rovněž do této nové verze jsem použil velmi malý programovatelný obousměrný regulátor z naší produkce a z vývoje realizovaného před více než deseti lety. Z hlediska funkcí nám byl tehdy vzorem populární malý regulátor Graupner SX3R ale pochopitelně zde nejsme na tak velké proudové zatižitelnosti. Nicméně trvalých cca 4-5A a špička okolo 7A pro daný typ elektromotorku bohatě vyhovuje. Oproti různým typům levných regulátorů z Aliexpresu je hlavní předností našeho provedení opravdu velmi příjemný průběh regulace a funkce které prostě kvalitní autíčkářský regulátor musí mít. Podrobnější popis bude rovněž předmětem samostatného článku, protože připravujeme výrobu nové série těchto regulátorů.
Regulator: As already mentioned above, in the first M430 model and also in this new version, I used a very small programmable two-way regulator from our production and from the development carried out more than ten years ago. In terms of functions, the popular small Graupner SX3R regulator was our model at the time, but of course we do not have such a large current carrying capacity here. However, continuous approx. 4-5A and a peak of around 7A are quite suitable for the given type of electric motor. Compared to various types of cheap regulators from AliExpress, the main advantage of our design is a very pleasant regulation process and functions that a quality automotive regulator simply must have. A more detailed description will also be the subject of a separate article, as we are preparing the production of a new series of these regulators.
Přijímač: Jak už bylo psáno výše, použil jsem dnes už nevyráběný přijímač Orange DS300, vykuchal ho z krabičky a zbavil konektorových pinů. Podotýkám že tyhle „operace“ by si měl každý dobře rozmyslet a rozumně zvážit své technické schopnosti a znalost pájení. V případě že vyhodnotíte situaci tak, že se touto cestou nevydáte, pak je na trhu určitá nabídka přijímačů s mikrokonektory, tématu se budu nepochybně brzy věnovat jelikož nemám zásobu přijímačů neomezenou.
Receiver: As already written above, I used the discontinued Orange DS300 receiver, gutted it from the box and removed the connector pins. I would like to point out that everyone should think carefully about these „operations“ and consider their technical skills and knowledge of soldering. If you evaluate the situation in such a way that you do not go this route, then there is a certain offer of receivers with micro connectors on the market, I will undoubtedly address the topic soon, since I do not have an unlimited supply of old receivers.
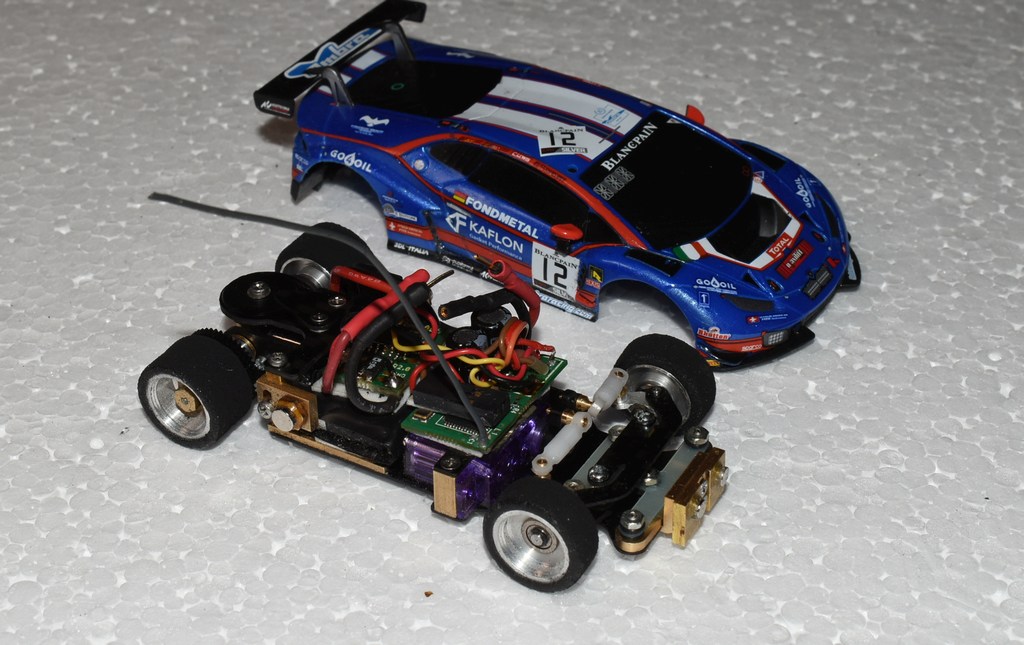
Máme tedy model osazený, lipolka nabitá a přišla první jízda a s ní poměrně výrazné zklamání. Měl jsem problémy model vytrimovat do přímého směru. Nakonec se ukázalo že jsem páku serva s oboustrannými táhly neměl na sředu a špatně naladěné délky táhel, kdy ta délka prostě nebyla u obou stejná dělaly velké potíže. Přesadil jsem tedy páku o jeden zoubek a upravil táhla. To výrazně pomohlo k vyrovnání, nicméně stejně jsem musel nakonec sáhnout do nastavení vysílače a omezit na jednu stranu rozsah výchylky. Ukazuje se že tyto velmi malé modely budou na pečlivost ustavení táhel řízení a na následné naladění výchylek poměrně dost citlivé. Takže rada pro budoucí majitele tohoto modelu, nespěchejte a věnujte téhle problematice opravdu dostatečnou péči, vyplatí se to.
So we have the electronic for model installed, the lipo battery charged and the first ride came, and with it quite a significant disappointment. I had trouble cropping the model in a straight line. In the end, it turned out that I didn’t have the servo lever with the double-sided tie rods in the middle, and the wrong length of the tie rod, where the length just wasn’t the same on both, caused great problems. So I moved the lever up one notch and adjusted the tie rods. This helped significantly with alignment, however I still had to go into the transmitter settings and limit the range of deflection to one side. It turns out that these very small models will be quite sensitive to careful adjustment of the steering rods and subsequent tuning of the deflections. So advice for future owners of this model, take your time and really pay enough attention to this issue, it will pay off.
Po vyladění táhel začal model vcelku poslušně jezdit, dobře držel přímý směr a pro stabilizaci výjezdů zatáček jsem nastavil menší rozběh na předních kolech. Nicméně i přes tyto pozitivní body chování se projevil znatelný problém v tom že model nebyl neutrální, konkrétně na jednu stranu zatáčení byl podvozek silně přetáčivý a na druhou stranu pro změnu dost výrazně nedotáčivý. Asi hodinové laborování s vysílačem, nastavením výchylek, expo atd, pokusy s diverenciálem stéle nenesly nějaké výraznější zlepšení. Jelikož ze zkušeností s modely 1/28 a 1/24 vím, že takové chování stoprocentně není normální a má nějakou příčinu začalo náročné hledání kde se stala chyba. První krok byl lepší podélné vyvážení a tak na volné místo vedle serva putoval kousek mosazi na dovážení. Bohužel bez efektu. Kontrola ložisek a volného pohybu předních kol nepřinesla také žádné zlepšení resp. nenašel jsem chybu. Ovšem při kontrole zadních ložisek se jedno jevilo trochu méně pohyblivé a tak došlo na výměnu. Model se trochu zlepšil ale stále přetrvávala asymetrie zatáčení L/P = nedotáčivost/přetáčivost. Začal jsem tedy detailně zkoumat chování pružení zadní nápravy protože oproti prvnímu modelu ze sklolaminátu síly 0,8mm se tento carbonový jeví znatelně měkčí na krut ale tvrdší na ohyb. Nakonec jsem pojal podezření, že pružiny tlumiče, které mimo přítlaku na třecí talířky také realizují základní předpětí odpružení celé zadní nápravy nedělají svoji práci jak by měly. Našel jsem v zásobách měkčí pružiny a osadil je. Ukázalo se že to byl s největší pravděpodobností ten hlavní problém, nesymtrie se velmi výrazně snížila, resp. téměř zmizela a tak po lehké úpravě výchylek řízení a po nepatrném povolení diferenciálu začal model dělat přesně to co jsem si představoval. Ukázka jízdy vyladěného modelu je na přiloženém videu níže. Ponaučení je jasné … tyto modely extra malé jsou opravdu hodně citlivé na správné nastavení a neodpustí žádnou chybu ať už při montáži nebo při nastavování táhel serva, odpružení atd. Ještě připomínám často opomíjený fakt a to že táhla musí v kulových kloubcích chodit opravdu lehce. Pokud jsou ale všechny výše popisované aspekty splněny je odměnou naprosto úžasná jízda ne nepodobná mnohem větším modelů „dospělých“ měřítek. Tahle „motorová myška“ opravdu stojí za vyzkoušení !!!!! Na malém prostoru přinese hodně adrenalinových zážitků.
After adjusting the rods, the model started to drive quite obediently, it held a straight line well, and I set a smaller run-up on the front wheels to stabilize the corner exits. However, despite these positive points of behavior, a noticeable problem was manifested in that the model was not neutral, namely, on one side of the cornering, the chassis was strongly oversteer and on the other hand, for a change, quite significantly understeer. About an hour of working with the transmitter, setting the deviations, expo, etc., experiments with the differential still did not bring any significant improvement. Since I know from my experience with 1/28 and 1/24 models that such behavior is 100% not normal and has some cause, I began a difficult search for where the error occurred. The first step was a better longitudinal balance, so a piece of brass went to the free space next to the servo for import. Unfortunately without effect. Checking the bearings and the free movement of the front wheels also did not bring any improvement or I didn’t find an error. However, when checking the rear bearings, one appeared a little less mobile, so it had to be replaced. The model improved a bit but the L/P turning asymmetry = understeer/oversteer still persisted. So I began to examine in detail the behavior of the suspension of the rear axle, because compared to the first model made of 0.8 mm fiberglass, this carbon one seems noticeably softer in torsion but harder in bending. Finally, I suspected that the shock absorber springs, which in addition to the pressure on the friction plates also implement the basic preload of the suspension of the entire rear axle, are not doing their job as they should. I found softer springs in the stock and fitted them. It turned out that this was most likely the main problem, the asymmetry was significantly reduced, or it almost disappeared, and so after a slight adjustment of the steering deviations and after slightly enabling the differential, the model started to do exactly what I imagined. A driving demonstration of the tuned model can be found in the attached video below. The lesson is clear … these extra small models are really very sensitive to the correct settings and will not forgive any mistakes either during assembly or when setting the servo rods, suspension, etc. I also remind you of an often neglected fact and that the rods must move really easily in the ball joints . But if all the aspects described above are met, the reward is an absolutely amazing ride not unlike much larger „adult“ models. This „motor mouse“ is really worth trying!!!!! It will bring a lot of adrenaline experiences in a small space.
Proudly powered by